Friday, April 26, 2024

"Spring Tags" with Amy Voorthuis

 Hi lovely creative peeps, 
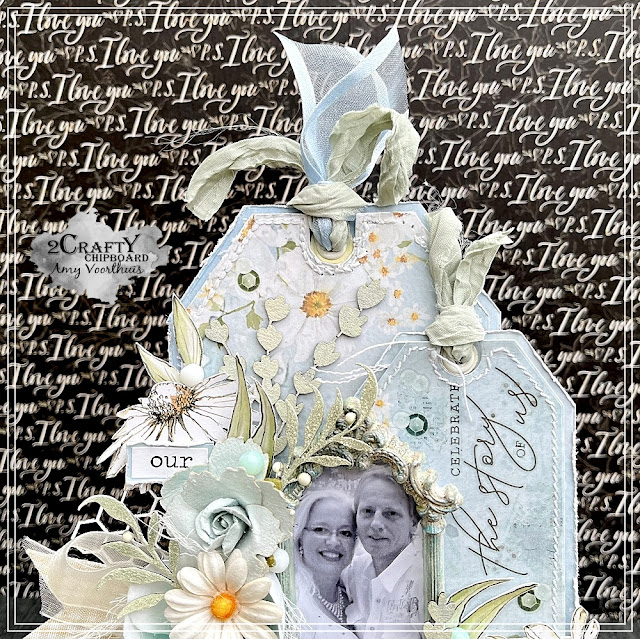
Hope you are having a warm & sunny day here in my part of the world spring is not breaking through yet! So for this post I made a couple of happy spring feeling tags sometimes it's very therapeutic to just make tags and fussy cut a little in front of the tv. My first tag is with a picture of my husband and I the 20th of this month we had our 12 year wedding anniversary.

Our Forever Jouney: 


For this tag I altered the chipboard pieces in a very simple way I just added some spray paint on the Foliage Set 6 & the Spring Flower Bunches and the first one was altered with a thin later of embossing powder and some crystal drops. 


The ATC banner was just altered with some white gesso and some wax. On the word arrow I added three layers of white embossing powder to create a thick layer. 


My second tag was made for a tag challenge {it was to add some bees} I had so much fun making these tags that I just can't stop hihi.

Bee Gorgeous: 

2 Crafty Chipboard used: 
Lattice Leaves
Frame Jenna
Mini # Word Set 1
Frame Viney Circles
ATC Word Banner Set 1
BeeYoutiful Set


I altered my pieces the same way as the first tag above only for the bees I used some posca pens in black & yellow but also some orange watercolour paint and to finish them of I added a piece of paper behind them 


For the leaves and frame I also used some spray paint and waxes. The big frame & word bee are altered with three layers of embossing powder to add a little dimension. 


My third tag is my last for this post and was made with the same collection as the first two that collection make my heart very happy & sunny oh how I long for spring & summer. 

Finding Beauty in Everyday: 

2 Crafty Chipboard used: 
Mini Branches
Phrase Stick Set 2 {6x4}
Leafy Sihouettes


I cut up the Phrase Stick Set 2 {6x4} in two and just added a thin layer of white gesso later I added some rusty brown wax the make a little woodgrain effect. 


Both leaves I used here are altered with some green spray paint both in two layers after that I added some matte white wax & some shinning white wax. 


 Thank you so much for stopping by, I will be back soon with another project hope to see you back...then it's may already wow.

Meanwhile if you would like to see more you could visit here: 

Amy's Pretty Papers

Thursday, April 25, 2024

Shine Bright
By Charmane Sharp


Hello all the 2Crafty Chipboard fans, Charmane here again to share this
layout I created to reflect my personality. As I scrapbook for my family
and future generations I think it is important to scrap the real me. I love
to celebrate every occasion, this one being NYE. I am loud, loving, and
always have 52 tabs open in my brain. This is reflected here in the multiple
layers full of fussy cut florals, flowers, lace flowers and wonderful 2Crafty
Chipboard to represent the busyness of my soul.


2Crafty Chipboard used...

Title- Shine Bright
Foliage set 1
Leafy Shrub set 1 x2 sets


The Leafy Shrub set adds a whimsical feel to my layout with its lovely
swirls and lengthy leaves. After Gesso was applied with a sponge to give
a little texture I brushed on some Prima Pastel Watercolour Confections
in two shades of pastel blue.


A second piece of the Leafy Shrub was flipped to mimic the opposite
curve to sweep around the left side of my layout. Tucked underneath is
pieces of the Foliage set which I coloured with Lindys Sea Grass
Green Spray for contrast.


Perfect title for my personality which I cut apart to separate for added
 definition. I built up layers of Watercolour in various shades of blue for
a mottled finish to pop off the elements below.


Please use this layout to inspire your own creation for your family to
remember the real you. Trust me it's important.

Until next time...

Charmane x


Wednesday, April 24, 2024

"believe"
Layout by Marie Sabatier


Hello everyone,

I present to you my second inspiration of this month of April.
A spring layout always using our fantastic chipboards including 
these beautiful flowers "Magnolia Stems".

"believe" 


The chipboards used:


- Christmas Mini-Word Set 2
- Magnolia Stems
- Aged Film Strip Set
- Flower Doilies
- Lacy Border Set 1


To begin, I apply a layer of white gesso to every chipboard.

To embellish the chipboards "Magnolia Stems" I chose ink "Oxide Distress" color "musard seed" 
and "rustic wilderness".

 I love the way these flowers were designed. 
Their size and structure make them easy to ink, making it even easier to play 
with colors and reveal details.


I proceed in the same way on the chipboard "Lacy Border". 
For the chipboard "Aged Film Strip", I put a thin layer of ink "Oxide Distress" 
color 'brushed corduroy'.
Using this close-up, I wanted to show you how chipboards fit perfectly with paper embellishments.


As for the chipboard "Flower Doilies" I apply a simple layer of white acrylic paint.
It really is one of my favorites. It has a striking resemblance to a lace doily.


In order not to waste the particle boards, I cut the "Aged Film Strip" particle boards.
One part for the top and another for the bottom on which I add my title.


I hope I gave you some inspiration with this layout.

See you soon for another inspiration!


Tuesday, April 23, 2024

A Glimpse of You ~ by Robin Schelin

 Hi everyone! Robin here again, back to share some more 2Crafty goodness!

This layout is of my granddaughter from many years ago. One of these photos got scrapped back then, but the other one didn't. So I thought, why not use both on the same layout. Hope you like it, and enjoy my process....


"Glimpse of You"


2Crafty chippies I used:

Foliage Set 11

Circular Border

A Glimpse of You


As I always say, gesso up those chippies!


I used the same medium on all the chipboard. I just used a lighter application on some, and a darker application on others to coordinate with the depth of color on the background, and with the foliage elements.

 I used Light Moss Green My Paper World Soft Color. This medium is kind of an oily stain that is easy to get different shades of the same color. I have had it for many years, and I don't know if you can even get it anymore. I have looked for it, but can't find it. If anyone happens to know where to get it, please let me know!!

Here is one of the pieces from the Foliage Set 11 at the left of the photo.  I dabbed it on with a stippling brush, and then wiped it off with a paper towel a few times to get a medium application. I wanted to give it a distressed look and to have it blend in with the floral design. Sometimes chipboard can be used as an extension of the design, which is what I tried to do with this layout.


Here, running between the photos is the Circular Border. With this piece, I applied the medium the same way, only using more of it to get a darker application. 


And then I placed another one of the pieces from the Foliage Set 11 here on the right side of the composition to give some balance. I used a medium application, the same as the one on the right.


Here is the bottom of the Circular Border.  I ran it the length of the design separating the photos. Again, for me, it's all about trying to achieve balance with my designs.  I think having a darker piece down the middle brings it all together.

For the title, A Glimpse of You, I used the lightest application of the medium. I wanted it the stand out against the red of her dress and the flower underneath it. Also, by using a very light application, I got the same color as the lighter color on the background paper.


I hope you like this layout and will try using varying depths of color from the same medium to create dimension on your layouts. Really easy, and creates beautiful transitions of color.

See you next month!


Monday, April 22, 2024

'Remember moments like this'
layout By Rachael Funnell


Hello everyone!
Rach back with you sharing my last layout for this month..
A bit of a vintage style layout,
 featuring Me & my boy photo taken back in 2011..


2 Crafty Chipboard used:
6" Doily clock face
Months Fine word set
Giant gears
Medium Steampunk gears
Remember Moments like this (title)


Let's start with this gorgeous 6" Doily clock face
Wanted to add some sort of treatment to this clock face 
so I went with randomly sponging on a light layer of gesso
and I just love how it has turned out...
 

Next up are the Giant & Medium steampunk gears I have added
I inked these with this lovely blue colour, then placed them thoughout my page..

Then I have the month July from the Months Fine word set 
That I have sitting just underneath the title and I have inked this with black ink.


Lastly for my title Remember Moments like this
I have simple given this two coats of gesso..

And that's it for me
I hope I have inpsired you in some way
Until next time

Saturday, April 20, 2024

You Rock - Laura Gilhuly

 Hi!

Laura back today to share my next layout for 2Crafty Chipboard!


The handsome young man is oldest Cody who really enjoys playing the guitar.  Music is a big part of his life.  I wanted to create a grungy masculine layout so I ripped, edged and used a stencil on the paper.


2Crafty Products used:


ATC Music Notes

Flourish 2

Grid Bits

Guitar

You Rock


I tucked the Flourish in behind the title and elements to give dimension after I inked it dark green and heat embossed it.  The title I wanted to stand out from the background and to achieve that I hightlighted the blue paint with copper paint


The guitar I covered in clear gesso, heat set, then applied green mist, watered down copper paint then inked with brown ink.


I also used green and brown ink on the Grid Bits and added a few painted music notes.


Thanks for looking